Introduction
I've gotten enough requests now that I thought I'd make a page about my darkroom. It never occurred to me because it's hardly special, just a corner of our garage I walled off, it's no bigger than a closet, though it does have decent ventilation and a GFCI wall outlet. It's not even a wet darkroom, I didn't have room for that. I do have a sink nearby though, the laundry sink. When designing the room I used a great book that I highly recommend called Into your Darkroom Step by Step by Curtin & Musselman that has great tips for setting up a permanent or temporary darkroom in a closet or bathroom, or designing your own. I actually had this corner picked out from the day we first looked at the house, but I didn't build it till three years after we moved in.
Basic Setup
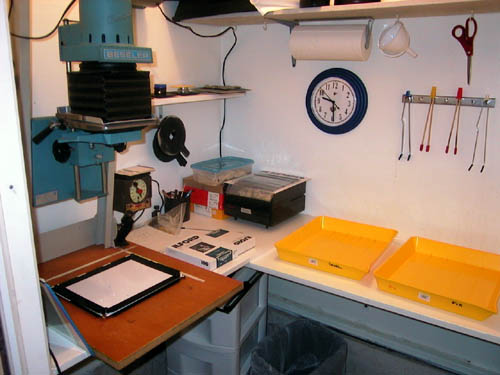
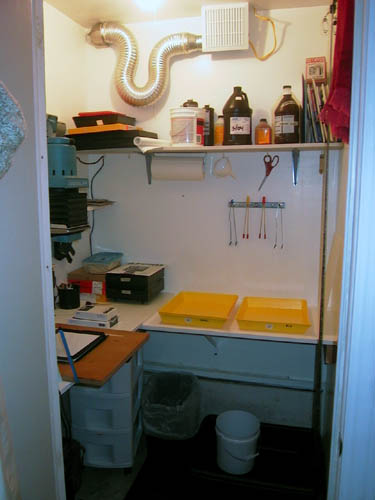
The 33" high counterspace is an L, with the space for the trays (wet side) overlapped by the counter for the paper and enlarger (dry side) to protect against overspill. The counter is covered with contact paper to keep the chemicals from eating through the laminate. The enlarger is plugged into a line conditioner that keeps the voltage constant, probably not a necessity if your house isn't 40 years old like ours is. I also have a small space heater for the cold winter nights and a non-LED clock radio under the counter to keep me company when I'm not using my iPod. The safelight is fairly generic and is mounted halfway up the wall and pointed upwards to prevent paper fogging. I keep my paper in paper safes, it was easier than building drawers :) Handy items on the counter: a note pad, a cup with pencil, Sharpie, and spotting brushes; static-free brush for negatives, and a dodging tool I made myself by soldering an alligator clip to the broken antenna from a portable stereo. I can clip torn paper of any size into it for dodging. Also a piece of foam and a plate of glass for making proof sheets, and a grain focuser. The glass I got locally at a glass shop that makes windows etc, he gave it to me for free because it was a castoff, would have been a couple bucks otherwise. (My other option was to take the glass from a framed picture that are a dime a dozen at thrift or discount stores.) I took the edge off by rubbing it with a smooth rock and then put masking tape around the edge where I handle it so I don't cut myself or get fingerprints on the glass.
The outlet vent is a $13 bathroom fan connected to the outside with a dryer flex hose (only ever use the metal ones, people!) on the inside and a dryer vent with a flap (nice one, cost more than the fan!) on the outside. The bends keep the light out. It's also caulked in place. The inlet vent is what the book called a 'wall vent', it uses the space between studs as a conduit. Outside at head height is a hole in the exterior wall covered by a vent. Below it in between the same studs is another vent on the inside, below the counter. Fresh air drafts in, light stays out. brilliant. I also painted the inside black where I could see it.
My enlarger is a Beseler 23C, solid as a rock. I upgraded in 2003 from a Bogen 22A Special, which could only do 35mm and 6x6, not 6x9. I had to cut all my Ilford Polycontrast filters when I switched, the filter drawer on the 23C is much smaller! The timer I have is a great old Time-O-Lite, with two outlets for the enlarger and safelight, so when the timer is on, so is the enlarger, and the safelight turns off till the timer resets. And the face glows in the dark so you can see the light. I love it. It's at least as old as I am and much more reliable ;)
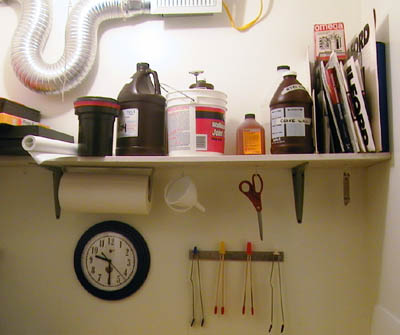
Shelves hold chemicals, books, tanks, lenses and other items. I also have a plastic rolling shelf unit under the counter that has other items like negative sheet holders, thumbtacks, tape, pens, other miscellaneous items. Hooks hold scissors and bottle opener so I can find them in the dark when I'm loading film. A kitchen utensil hanger holds my tongs. Paper towels are a must; a hand towel is also a good idea to have handy. I hang my drying negs with jumbo office supply clips from a towel bar I got at a rummage sale for 50 cents. At the bottom of the strip I clip 'real' negative drying clips, I think they take too much of the neg to use at the top (as it comes off the spool), but the bottom is the film leader so it doesn't matter.

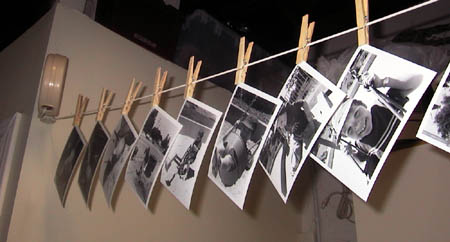
The back of the door has a hook for my apron and a wool cap for those winter nights. On the floor is an industrial rubber mat from Costco to reduce foot fatigue -- one of those 'why didn't I do this sooner' purchases; a plastic trashcan (a must have!) and the large tub I use to hold the prints in before I wash them. It's from the hardware store, it's the kind you'd mix small amounts of cement in. I fill it with a clean bucket reserved just for that purpose before I begin, which itself hangs on a hook under the counter. Print washing is done in a tray with another old reliable item, a well-used Kodak Tray Siphon. The prints get squeegeed on a large plastic kitchen cutting board and hung to dry on a retractable clothesline I mounted on the outside of the darkroom, with clean clothespins I reserve just for this purpose.
Note a minor theme here - a little creativity goes a long way. I'm always amazed watching the behind-the-scenes of other industries on shows like PBS' award-winning Reading Rainbow. Often I see tools used for purposes I would never have thought - drywall spreaders used to chop bread dough into balls, trash cans and wheelbarrows used for mixing ingredients for toothpaste or ice cream, you get the idea. Once you think outside the box you realize you can find useful items in unexpected places, and that kind of creativity helps to stretch a tight budget and a tight space. I'm pretty sure the whole thing cost me less than $500 to build and equip.
Setup Tips & Tricks
Light proofing: for printing it doesn't have to be 100% light tight but for film loading it should be as near as possible. Use a changing bag if you have to. I sealed around the prehung door with two types of weatherstripping, with another weatherseal at the bottom of the door. Caulk was my friend when making the room light tight.
Shelves are important, I don't think you can have enough of them. I try to keep the chemicals up high because I have small children, and the door only locks from the inside. To avoid the risk of unattended electrical problems, I designed the room in a circuit such that when you turn on what seems to be the light switch, the room is 'hot'. There isn't any electricity in the room until the switch is on. In the ceiling is a single bulb with a pull-string switch. When I turn it off, only the safelight lights the room.
Having everything you need, and only what you need, is important, particularly in a small darkroom. Make sure everything that you need quickly is within easy reach, and put it right back where it goes as soon as you're done so you don't go fumbling around in the dark and ruin something precious!
Oh, Yeah, Developing
I use a Paterson tank, it's easy to load, easy to use, lifetime warranty. It's the Universal type that takes two 35mm or one 120 at a time. (I never really have more than that, so it's ok). I exclusively develop in D-76 diluted 1:1, it's cheap, plentiful and relatively foolproof, and diluting it 1:1 gives me a chance to control the temperature. I do my developing in the kitchen sink. Seriously. Using the guide times on the bottle. This is my recipe, it works for me, I don't have much reason to experiment, you can use it as a starting point:
- Start timing, add developer, rap tank against sink/counter to release bubbles
- Agitate 30 seconds, then 5 seconds every 30 seconds for PlusX, TriX, Foma, Efke, Macophot, High Speed Infrared...
OR 10 seconds every minute for HP5, SFX, and TMax - Pour out developer at end of time, rinse film in cool water for 1 minute
- Pour in fixer, agitate 30 seconds
- Check film after 3 minutes, if milky leave another 30 sec, check again
- Put fixer back in bottle, rinse film in cool water for 1 minute
- Add Hypo Clearing Agent, agitate 1 minute, pour out
- Wash film in running water 5 minutes
- Empty tank, put in 1 drop Photo-flo per roll (120 counts as 2) and fill with same amount of water as you had developer, drop reel back in and let stand 30 sec
- Hang to dry in dust-free area with clip on bottom to keep film from curling
I culled these instructions from various sources and boiled them down to a common workable process. Now, I know everyone who's been doing this a while has their preferences, and some people are very religious about it, so don't bother writing to tell me another way or chemical is better, I like this one. It's been working for me for a while now, no complaints!
To Squeegee or not to Squeegee?
Another source of religious fanatacism. I didn't, and now I do. The Photo-flo helps but I've had to rewash negs more than a couple times just to get some gnarly water spots off. BUT I don't use those crappy sponge-tipped tongs that can scratch your negs with a dust grain, I use the time-honored method of smoothing the negative strip between two wet fingers.
More Notes on Negs
120 film can be tricky to load on a spool since it's so wide and kind of flimsy compared to tough, narrow little 135 film. Now, I don't know anyone else that does this, but when I'm loading 120 I've found it easier to unroll the whole exposed film in the dark, remove the tape and paper, and load it backwards. See, it's much curlier near where it was attached to the spool, and loading it from the other end is much easier for me, I've been doing it this way for years now. Just remember -- as always when spooling your film -- to wash and thoroughly dry your hands first, and touch the film as little as possible, except on the edges.
For a long time I was frustrated with my inability to properly cut my negative strips, I came up with a trick I use now that's virtually foolproof even for a fool like me: with sharp scissors I start the cut adjacent to the space between frames (which varies from camera to camera mind you!) and then look straight across to the same sprocket hole position and aim for that without looking at the frames in beetween.
And of course I store the negs, labeled with the date, a short summary, and the camera I used, in archival negative binder sheets in negative holder binders, not in the darkroom where the temperature varies with the garage, but in the house where I can keep an eye on them.
Printing Tips & Tricks
First tip - take a class. I did, and I consider the experience to be not only indispensable for learning how to print, but pivotal in my own development as a photographer. I took my printing class through the Photography Center in San Francisco, I can't recommend it highly enough. Check your local community college or equivalent for night classes. Most classes include full access to a community darkroom for the duration of the class, definitely a bonus if you don't have one of your own yet!
Second tip - like I tried to say with the developing, find a method that works for you and be consistent. But don't make bad habits at the beginning, they're hard to break as with every aspect of your life. Drill the basics until they're instinct. Random agitation is important. Not soaking your RC prints too long is important. Changing your chemicals when they start to show signs of weakness is important. Keeping your environment dust and clutter-free is important. Ventilation is important. Fanatical temperature control, in my opinion, not very important. Your print will print quickly or slowly but it will print. Those other things are much more key than a degree of temperature variation in your fixer.
And of course, have a clock that tells time in seconds! Preferably a nice analog clock that ticks, so that if you're developing sheet film in a tray in total darkness you can count the seconds off without having to see the clock.... Hang it over the wet side of your darkroom so you can see it while you're developing.
Here's one that I can't remember if I thought of it myself or not - when you're using a grain focuser, don't focus on the easel, focus on the back of an old scratch print that's on the same kind of paper you're using for the new print, otherwise your focus will be off by the thickness of your paper, which might be a lot, depending.
More: bamboo tongs suck. Splurge and get the nicer rubber-tipped metal ones if you can find them. The angled end makes it much easier to pick up your print by the corner without bending it or having it slip off back into the soup.
Books I Recommend
Any basic book on printing and developing will tell you what you need to know, but I found it helpful to have a reasonably current Kodak Black and White Darkroom Dataguide, and the Ilford printing guide that you get with the student Multigrade pack and filters. Another book I got as a gift that I've found helpful for tricky situations is Essential Darkroom Techniques by Eastland.
Comments? Questions? Kudos? Flames? Go ahead and email me. I hope you find some of this useful.